API Intergration with ELMO
|
About the API Interface
Using API interface, you can transfer existing employee data from your ELMO system into edays. This guide will show you how to set up the interface, and complete the additional fields in ELMO, to ensure users are set up correctly in edays.
The below table shows which fields in ELMO sync to fields in edays. Some of these ELMO fields are “custom” fields, meaning they will be added as part of your ELMO implementation. There’s also a few edays fields that won’t be populated through the API, but will come from the edays configuration:
ELMO Field | edays Field | ELMO Custom Field | Configured in edays |
Username | Login/SSO ID |
|
|
First Name/Preferred First Name | First Name |
|
|
Last Name/Preferred Last Name | Last Name |
|
|
|
| ||
Employee Number | Employee Number |
|
|
Start Date | Employment Start Date |
|
|
End Date | Left Date |
|
|
Active | Is Leaver |
|
|
Date of Birth | Date of Birth |
|
|
Role | Role |
|
|
Work Pattern (Custom) | Rota | ✔ |
|
Work Pattern Effective Date (Custom) | Rota Start Date | ✔ |
|
FTE (Custom) | FTE | ✔ |
|
FTE Change Effective Date (Custom) | FTE Change Effective Date | ✔ |
|
User Template (Custom) | User Template | ✔ |
|
Legal Entity | Country |
|
|
Location | Location |
|
|
Department | Team |
|
|
Manager | Authoriser ID |
|
|
| This/Next Year Entitlement |
| ✔ |
| Entitlement Time Unit |
| ✔ |
| Hours Per Day |
| ✔ |
ELMO prerequisites
There’s three important pieces of information you need, ahead of configuring the integration in edays:
- Client ID
- Client Secret
These need to be created by ELMO themselves. Please contact the ELMO project manager to obtain this information.
Linking edays with ELMO
Once you have been provided with the ClientID and Client Secret, they can be added to your edays system.
In edays, go to; Admin Panel > Additional Settings > Integrations and you will be met with the following page. The first thing to do is enable the ELMO Connector:
Once enabled, you can input the ClientID and Client Secret. You should also input an email address for the person you want to receive alerts regarding any errors during the initial and future sync’s:
Once filled out, click save and you should see a message to advise if it connected successfully or not.
Essential Configuration Ahead of Sync
Before you run your first user sync, it is best to have your edays system completely configured. It’s also best to make sure that the initial users to be imported into edays are set up correctly in ELMO.
As mentioned previously, there are some custom fields that will be created in ELMO to ensure users have the correct settings when synced into edays. The settings are found in a users profile on ELMO.
Go to; Administration > General > Users > (Edit a user) > Profile
Scroll down to the “Profile Fields” section where you will see the custom edays fields. There are 5 in total:
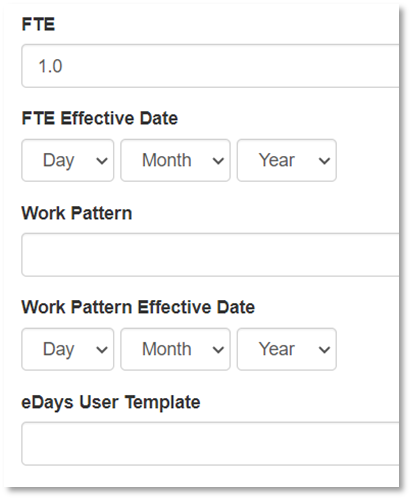
NOTE: These fields can be updated in bulk through the Export/Import process within ELMO. Please see some other information about each of the fields below
- FTE
- This must be a decimal between 0.1 and 1.0.
- FTE Effective Date
- This allows you to set a date that the above specified FTE was set.
- This will be useful for future FTE changes so edays can recalculate entitlements part way through a year.
- Work Pattern
- This is a drop-down list of Rota patterns that exist in edays.
- If you add new Rota’s in edays, you will need to add them to this list also.
- Work Pattern Effective Date
- This allows you to set the date that the above specified rota started on.
- It will ensure the rota is correctly assigned to a user and only shows the new rota in edays from the specified date.
- Edays User Template
- This is a drop-down list of all the Templates that exist in edays.
- If you add new templates in edays, you will need to add them to this list also.
- You will want to add a template that will be assigned to anyone that doesn’t need to sync into edays (e.g “None”). This will be used to exclude those users from the sync
Syncing the Users to edays
Once you are happy that all the fields have been updated for the relevant users, you can proceed with syncing them into your edays system.
To do this go back to edays, and to the “Integrations” page.
From here you first need to select which users you want to exclude from the sync. The easiest way to do this is by the “edays User Template” field that should now be populated for everyone in Elmo.
To do this go to “User Sync” and click “Exclude by group”. You will then be able to select the template you wish to exclude:
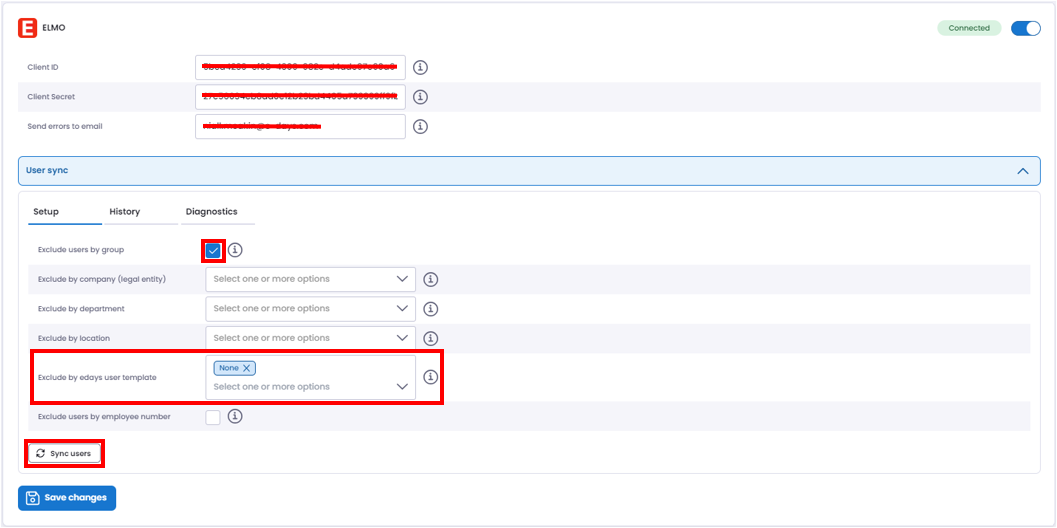
The page should now look something like the above. (you may of course have excluded users by the other groups). And when you are happy you can click “Sync Users”